Tajima TME-DC


Tajima TME-DC, TMFD-DC User Manual

Instructions

(C) 2009-2018 PLR Electronics


Basics


There are four kinds of the Tajima TME-DC machine:

  • TME-D: Flat frame, main motor underneath the control panel. Underneath bar switch.
  • TME-DC: Cap frame, main motor behind the machine. ON/OFF buttons instead of bar switch.
  • TMEF-D: Flat frame, main motor to the far left. Under bar switch.
  • TMEF-DC: Tubular frame, with hydraulic table. ON/OFF buttons instead of bar switch.

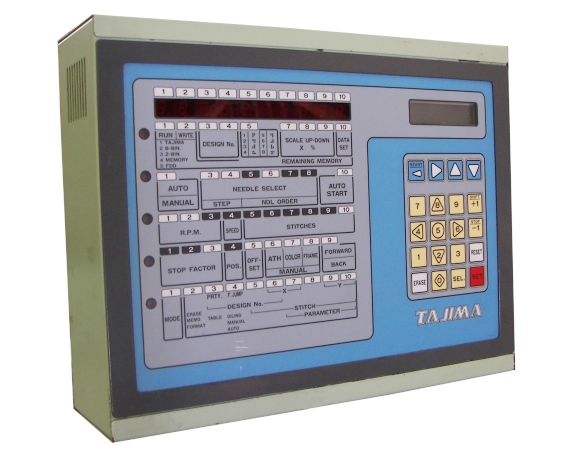
Main buttons (on the right)

  • NUMBER PAD: To enter a 1-9 value.
  • NUMBER PAD ARROW KEYS: Overlays the number keys. To manually move the frame, or the hydraulic table.
  • BLUE ARROW KEYS: To move through the menu.
  • +1 and -1: To scroll through submenus, such as the color change sequence.
  • RESET: To cancel errors
  • SET: To make a selection
  • ERASE: Part of the erase design function
  • SEL (SELECT): To scroll through available choices, usually for ON/OFF settings.
  • RESET: To cancel errors.

Main menu list

  • ROW 1, Design Select: To load a design from a Reader, or choose a design from memory.
  • ROW 2, Color Change: To set the color change sequence.
  • ROW 3, Information: To show RPM and number of stitches.
  • ROW 4, Manual Control: To show errors, stop position, and manually control ATH, current needle, and the frame.
  • ROW 5, Maintenance and Editing: To change parameters.

LCD buttons (upper right)

  • UPPER ARROW KEYS: To scroll through selections inside of the smaller LCD display.

Status lights

  • STOP POSITION: Lights up when your main shaft is at the STOP position, marked in RED on the flywheel. This light is located in ROW 4, Manual Control, POS, next to where it says STOP FACTOR.
  • CURRENT NEEDLE: Shows a number of your current needle position. This number is located in ROW 4, Manual Control, COLOR. Will display C or a backwards C whenever you have gone past the last needle or before the first needle. Will also display if the dipswitches are set for CAP FRAME.

Bar switch and button (under table, certain models only)

  • BAR SWITCH LEFT: Pull bar to the left to stop, or to go back one stitch.
  • BAR SWITCH RIGHT: Pull bar to the right to start.

Frame move, ATH, RPM

  • MOVE FRAME: Use the NUMBER PAD ARROW KEYS. Make sure you are first on menu location FRAME, which is in Row 4, Manual Control, FRAME. Press the [5] key to switch between high speed and low speed.
  • IMMEDIATE THREAD TRIM: Make sure you on menu item ATH, which is in Row 4, Manual control. Press 1, then SET.
  • CHANGE R.P.M. SPEED: During stitching, press the NUMBER PAD ARROW KEYS up or down. [8] increases speed, and [2] decreases speed.

Load a new design


Loading from the Disk Drive or USB Floppy Emulator.
1. Move the cursor to the WRITE position, in Row 1, WRITE 2.
2. Press the 5 key and then press SET.
3. Please wait. The control panel will beep while the floppy disk or USB is being read.
4. The cursor will now move to the LCD screen on the upper right.
5. A list of files will be displayed on the LCD screen. Press the upper UP and DOWN arrow keys to scroll.
6. Press the SET key to make your selection.
7. Now it will ask for a memory location to store it in. Change, or accept the current one, and press SET.
8. It will activate the LCD to ask you if you want to rename the file. Press SET to accept the current name.
9. The LCD will turn off, and the rotation option will blink now. It defaults to 1, which is no rotation. Press SET to accept.
10. The scale option will blink now. It defaults to 100 percent. Press SET to accept.
11. The final choice is auto jump, usually 1 for auto-jump disable. Press 1 and SET.
12. Please wait until the floppy drive finishes loading.
13. Completion!
You don’t have a USB replacement yet? Purchase a new USB Floppy Disk Drive for your Tajima TME-DC machine! Look at the front page of PLR Electronics for more!

icon carrito

Loading from the Tape Reader or USB Reader.
1. Move the cursor to the WRITE position, in Row 1, WRITE 2.
2. Press the 1 key and then press SET.
3. The blinking number is the first empty memory location for your new file.
4. Change this memory location or leave it.
5. You have the option now to name the design. Press SEL KEY here if you want to name it, on the extra LCD screen. Use the upper left-right keys and SET to choose a name, and SEL KEY when done.
6. Press SET to accept memory location and name.
7. The rotation option will blink now. It defaults to 1, which is no rotation. Press SET to accept.
8. The scale option will blink now. It defaults to 100 percent. Press SET to accept.
9. The final choice is auto jump, usually 1 for auto-jump disable. Press 1 and SET to begin the download process.
10. Completion!
You don’t have a Tape Reader? Purchase a new USB Reader for your Tajima TME-DC machine, that can also be plugged into your older Tajima machines! Look at the front page of PLR Electronics!

icon carrito

Select a design in memory


1. Move the cursor to the RUN position, in Row 1, RUN.
2. Press the 4 key and then press SET.
3. The first memory location with a stitch file will display. Type in the desired number, or use the +1 -1 numbers to scroll through the selections.
4. Press the SET key when done selecting.
5. The rotation option will blink now. It defaults to 1, which is no rotation. Press SET to accept.
6. The scale option will blink now. It defaults to 100 percent. Press SET to accept.
7. The final choice is to accept the data. Press 1 and SET.
8. Completion!

Setting color change


1. Move the cursor to the AUTO/MANUAL position, in Row 2, AUTO/MANUAL.
2. The automatic color change light will blink. Automatic mode will blink [0], and manual mode will blink [-].
3. Press the SEL (SELECT) key to switch between automatic and manual mode.
4. Press SET when done. If you have chosen manual, these instructions stop here.
5. The process will start from the first color. Press SET to continue.
6. The needle for the current color will blink. Type in the desired needle number.
7. Press the [+1] key to accept and go to the next color change.
8. If you made a mistake, you can press the [-1] key to go backwards.
9. Repeat the process until all colors are programmed.
10. When finished, then press the SET key immediately after pressing the [+1] key.
11. Finished setting colors!
12. If desired, the last item on the row is the Auto Start feature, where the SEL key turns it on or off.

Erasing design in memory


1. Move the cursor to the RUN position, in Row 1, RUN.
2. Press the 4 key and then press SET.
3. Now choose the design you wish to erase with the number keys.
4. Press ERASE, then press SET.
5. Wait a few moments until completion.

Erasing all designs


1. Move the cursor to the RUN position, in Row 1, RUN.
2. Press the 4 key and then press SET.
3. For the design number, choose 0.
4. Press ERASE, then press SET.
5. Wait a minute until completion.

Manual color change


1. Move the cursor to the COLOR position, in Row 4, COLOR.
2. The current color is listed in this position.
3. Choose a new needle with the NUMBER KEYS and then press SET.
4. The needles should now move to the new color.

Immediate thread trimming


1. Move the cursor to the ATH position, in Row 4, ATH.
2. Type in 1 with the number pad and press SET.
3. The thread trim operation should activate now.

Hydraulic table


1. Only applicable if you have the hydraulic table.
2. Move the cursor to the MODE position, in Row 5, MODE.
3. Type in 5 with the number pad and press SET.
4. Press the UP and DOWN arrow keys on your regular number pad (keys 8 and 2) to move the table either up or down.

Tajima Error Codes


Press the RESET button to cancel most errors. You may have to change menus to the STOP FACTOR menu.

  • 211: Stop position error. Manually move main shaft until at stop position, or try the ATH operation.
  • 221, 222, 223, 224: Limit switch is tripped. Check position of limit switches compared to the frame’s position. Adjust if needed.
  • 225: Cap frame travel past X limits.
  • 281: Color change timeout. Check the color change motor and mechanicals.
  • 291: Thread break.
  • 2B1, 2B2, 2B3, 2B4, 2B5, 2B6: Problem with the tape reader. May give several errors, please reset them all before trying the tape reader again.
  • 2B7: Please select design again.
  • 2B9: Memory Error. Try the erase-all-designs function.
  • 2BB: Frame back exceeded. Stop going backwards.
  • 2BC: Please select another design.
  • 2C1: Start button pressed while control panel is busy.
  • 2CD: Design corrupted due to power loss. Reload design.
  • 312: Encoder problem. Check the encoder line.
  • 314: Main shaft not rotating. Check if the RED light on the main motor brake box is lit; if so, reverse two wires in your 3-phase power plug. Check magnetic contactor next to the main power relay.
  • 316: Main motor problem. Check the brake box, which is attached to the main motor.
  • 321: DU-10 XY driver reporting a problem. Check if both lights are green, on the DU-10 box.
  • 324: Excessive slowdown during sewing. Lower RPM or check mechanicals or fabric.
  • 325: Cap frame sensor error.
  • 382: Color change motor not moving. Check motor and encoder.
  • 383: Needle position problem. Check color change needle position and manually move to proper position if needed.
  • 384: Color change is not centered on the needle. Check head and the sensors.
  • 3A2: Thread trimmer problem. Check IMM card.
  • 3D1, 3D2: Battery failure.
  • 3D3: Computer failure error. Check cabling that nothing is unplugged; reseat cables.
  • 3D5: Memory problem. Erase all designs, or check IDM card.
  • 3D6: Problem with the IDM card.
  • 3D7: Problem with the main shaft speed control. Check IMM or IDM card.
  • B01: Floppy disk format is not correct. Is the disk bad, or the floppy drive configured correctly?
  • B02: Floppy file system is not correct. Is the disk bad, or the floppy drive configured correctly?
  • B03: Floppy is marked as read-only.
  • B04: Floppy drive says no disk is inserted. Check drive configuration.
  • BC1: No tajima designs found.
  • BC2: Cannot overwrite same name design.
  • BC4: Floppy write failed. Re-try.
  • BC5: Floppy disk is full.
  • C01: No response to floppy drive activation signal. Check drive configuration.


Click here for other embroidery machine manuals


(C) 2009-2018 PLR Electronics

Spacer