
Tajima TME-HC, TMEF-HC User Manual
Instructions
(C) 2009-2018 PLR Electronics

Basics
There are four kinds of the Tajima TME-HC machine:
- TME-H: Flat frame, main motor underneath the control panel. Underneath bar switch.
- TME-HC: Cap frame, main motor behind the machine. ON/OFF buttons instead of bar switch.
- TMEF-H: Flat frame, main motor to the far left. Under bar switch.
- TMEF-HC: Tubular frame, with hydraulic table. ON/OFF buttons instead of bar switch.
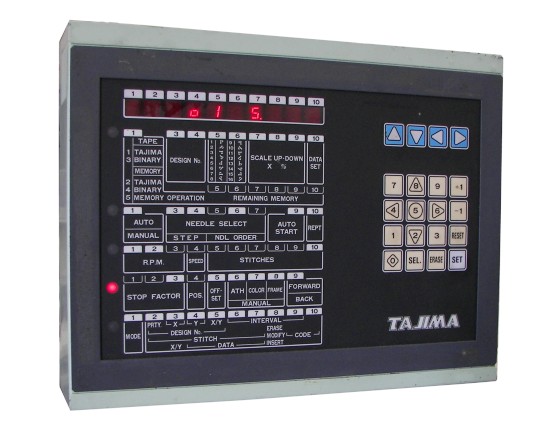
Main buttons (on the right)
- NUMBER PAD: To enter a 1-9 value.
- NUMBER PAD ARROW KEYS: Overlays the number keys. To manually move the frame, or the hydraulic table.
- BLUE ARROW KEYS: To move through the menu.
- +1 and -1: To scroll through submenus, such as the color change sequence.
- RESET: To cancel errors
- SET: To make a selection
- ERASE: Part of the erase design function
- SEL (SELECT): To scroll through available choices, usually for ON/OFF settings.
- RESET: To cancel errors.
Main menu list
- ROW 1, Design Select: To load a design from a Reader, or choose a design from memory.
- ROW 2, Color Change: To set the color change sequence.
- ROW 3, Information: To show RPM and number of stitches.
- ROW 4, Manual Control: To show errors, stop position, and manually control ATH, current needle, and the frame.
- ROW 5, Maintenance and Editing: To change parameters.
Status lights
- STOP POSITION: Lights up when your main shaft is at the STOP position, marked in RED on the flywheel. This light is located in ROW 4, Manual Control, POS, next to where it says STOP FACTOR.
- CURRENT NEEDLE: Shows a number of your current needle position. This number is located in ROW 4, Manual Control, COLOR. Will display C or a backwards C whenever you have gone past the last needle or before the first needle. Will also display if the dipswitches are set for CAP FRAME.
Bar switch and button (under table, certain models only)
- BAR SWITCH LEFT: Pull bar to the left to stop, or to go back one stitch
- BAR SWITCH RIGHT: Pull bar to the right to start.
Frame move, ATH, RPM
- MOVE FRAME: Use the NUMBER PAD ARROW KEYS. Make sure you are first on menu location FRAME, which is in Row 4, Manual Control, FRAME. Press the [5] key to switch between high speed and low speed.
- IMMEDIATE THREAD TRIM: Make sure you on menu item ATH, which is in Row 4, Manual control. Press 1, then SET.
- CHANGE R.P.M. SPEED: During stitching, press the NUMBER PAD ARROW KEYS up or down. [8] increases speed, and [2] decreases speed.
Load a new design
1. Move the cursor to the TAPE position, in Row 1, TAPE.
2. Press the 2 key and then press SET.
3. The blinking number is the first empty memory location for your new file.
4. Change this number, or leave it. Press the SET key when done.
5. The rotation option will blink now. It defaults to 1, which is no rotation. Press SET to accept.
6. The scale option will blink now. It defaults to 100 percent. Press SET to accept.
7. The final choice is to start data input from the reader. Press 1 and SET to begin the download process.
8. Completion!
You don’t have a Tape Reader? Purchase a new USB Reader for your Tajima TME-HC machine! Look at the front page of PLR Electronics!

Select a design in memory
1. Move the cursor to the TAPE position, in Row 1, TAPE.
2. Press the 5 key and then press SET.
3. The first memory location with a stitch file will display. Type in the desired number, or use the +1 -1 numbers to scroll through the selections.
4. Press the SET key when done selecting.
5. The rotation option will blink now. It defaults to 1, which is no rotation. Press SET to accept.
6. The scale option will blink now. It defaults to 100 percent. Press SET to accept.
7. The final choice is to accept the data. Press 1 and SET.
8. Completion!
Setting color change
1. Move the cursor to the AUTO/MANUAL position, in Row 2, AUTO/MANUAL.
2. The automatic color change light will blink. Automatic mode will blink [0], and manual mode will blink [-].
3. Press the SEL (SELECT) key to switch between automatic and manual mode.
4. Press SET when done. If you have chosen manual, these instructions stop here.
5. The process will start from the first color. Press SET to continue.
6. The needle for the current color will blink. Type in the desired needle number.
7. Press the [+1] key to accept and go to the next color change.
8. If you made a mistake, you can press the [-1] key to go backwards.
9. Repeat the process until all colors are programmed.
10. When finished, then press the SET key immediately after pressing the [+1] key.
Erasing design in memory
1. Move the cursor to the TAPE position, in Row 1, TAPE.
2. Press the 5 key and then press SET.
3. Now choose the design you wish to erase with the number keys.
4. Press ERASE, then press SET.
5. Wait a few moments until completion.
Erasing all designs
1. Move the cursor to the TAPE position, in Row 1, TAPE.
2. Press the 5 key and then press SET.
3. For the design number, choose 0.
4. Press ERASE, then press SET.
5. Wait a minute until completion.
Tajima Error Codes
Press the RESET button to cancel most errors. You may have to change menus to the STOP FACTOR menu.
- 211: Stop position error. Manually move main shaft until at stop position, or try the ATH operation.
- 221, 222, 223, 224: Limit switch is tripped. Check position of limit switches compared to the frame’s position. Adjust if needed.
- 225: Cap frame travel past X limits.
- 281: Color change timeout. Check the color change motor and mechanicals.
- 2B1, 2B2, 2B3, 2B4, 2B5, 2B6: Problem with the tape reader. May give several errors, please reset them all before trying the tape reader again.
- 2B7: Please select design again.
- 2B9: Memory Error. Try the erase-all-designs function.
- 2BB: Frame back exceeded. Stop going backwards.
- 2BC: Please select another design.
- 2C1: Start button pressed while control panel is busy.
- 2CD: Design corrupted due to power loss. Reload design.
- 312: Encoder problem. Check the encoder line.
- 314: Main shaft not rotating. Check if the RED light on the main motor brake box is lit; if so, reverse two wires in your 3-phase power plug. Check magnetic contactor next to the main power relay.
- 321: DU-10 XY driver reporting problem. Check if both lights are green, on the DU-10 box.
- 324: Excessive slowdown during sewing. Lower RPM or check mechanicals or fabric.
- 325: Cap frame sensor error.
- 382: Color change motor not moving. Check motor and encoder.
- 383: Needle position problem. Check color change needle position and manually move to proper position if needed.
- 384: Encoder problem. Check encoder.
- 3A2: Thread trimmer problem.
- 3D3: Computer failure error. Check cabling that nothing is unplugged; reseat cables.
(C) 2009-2018 PLR Electronics