
Tajima TMFX User Manual
Instructions
(C) 2009-2018 PLR Electronics

Basics
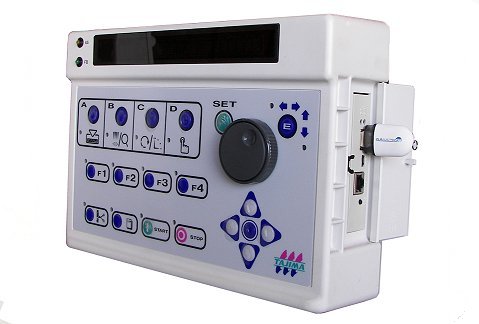
Control Panel Keys
- MENU KEY A: Memory and read operations
- MENU KEY B: Color change programming, scaling, rotation
- MENU KEY C: Maximum RPM and stitch counter
- MENU KEY D: Manual operations, ATH
- SET KEY: To select, reset errors, install
- FRAME TRAVEL KEY: At top right. Activates jog dial, returns to main menu
- JOG DIAL: Spin inner dial to make menu selections, or to change sewing speed
- F1 KEY: Jump settings
- F2 KEY: Inch parameters, upper thread break settings
- F3 KEY: ATH, UTC, CAP settings
- F4 KEY: Network connection
- F5 KEY: Not used in TMFX, is START button on TMEX
- F6 KEY: Not used in TMFX, is STOP button on TMEX
- DATA EDIT KEY: Picture of scissors. Data editing.
- FLOPPY FORMAT: Picture of floppy disk. Formatting of disks.
- SET + POWERUP: Start installation and configuration process
- F3 + POWERUP: Start configuration without installating
- SET + F2 KEY: Maximum RPM setting
- D + POWERUP: Color change potentiometer setting
Start Stop buttons
- START BUTTON: Press to start, hold down to inch
- STOP BUTTON: Press to stop or move frame one stitch; hold to move frame continuously
Frame move
- ARROW KEYS: To manually move the pantograph.
Load a new design
Loading from the Disk Drive or USB Floppy Emulator.
1. Press MENU KEY A until number 2 F: is displayed.
2. Press the SET key to start reading from the disk drive.
3. The first file found on the disk will display. Spin the inner jog dial to scroll.
4. Press the SET key to select the design shown.
5. You will now be asked for a memory location, and it will default to the first available.
6. Spin the jog dial or press SET when ready.
7. The file will now be loaded. Please wait.
8. Finished!
You don’t have a USB replacement yet? Purchase a new USB Floppy Disk Drive for your Tajima TMFX machine! Look at the front page of PLR Electronics for more!

Loading from the Tape Reader or USB Reader.
1. Press MENU KEY A until number 3 T: is displayed.
2. You will now be asked to identify the tape data.
3. Spin the jog dial and choose T for Tajima tape.
4. Press SET.
5. Now select a memory location with the jog dial.
6. Press SET.
7. The reader will now start downloading, wait for completion.
8. Finished!
NOTE: Designs loaded from the tape reader port will not be able to use the TRACE function. Tajima designed it this way.
Select a design in memory
1. Press MENU KEY A until number 1 M: is displayed.
2. Spin the inside of the jog dial to select desired design.
3. Press SET to finish.
Setting color change
1. Be sure that automatic color change has been activated.
2. When you press MENU KEY B, it should say 1 AC:o AS:o.
3. If auto color change is not active, then spin the dial until it says AC:o and press SET twice.
4. Press MENU KEY B until number 2 NDL(01): is displayed.
5. It is now asking you to program the first color.
6. Spin the inner jog dial and press SET when ready. The outer jog dial will move between codes if you make a mistake.
7. Repeat until done. Press SET twice at the end.
8. Finished!
Erasing design in memory
1. Press MENU KEY A until number 5 DM: is displayed.
2. The speaker will beep continuously to warn you that you are in delete mode.
3. Spin the inside of the jog dial to select design to delete.
4. Press SET to finish.
Erasing all designs
1. Press MENU KEY A until number 5 DM: is displayed.
2. The speaker will beep continuously to warn you that you are in delete mode.
3. Spin the inside of the jog dial until it says 5 DM:00.
4. Press SET to finish.
Manual color change
1. Press MENU KEY D until number 1 M_NDL: is displayed.
2. It will list the current needle position.
3. Spin the inner jog dial and press SET.
4. The needle will change to the new location.
Immediate thread trimming
1. Press MENU KEY D until number 2 M_ATH:- is displayed.
2. Spin the inner jog dial until a circle is displayed instead of a minus.
3. Press SET. Make sure the needle will not hit the hoop, first!
Configuration
1. Turn off machine.
2. Hold down F3 and turn on the machine at same time.
3. It will now blink FX:2; if you have a TMFX or TMEX or TMFXII, select 2 and press SET.
4. It will ask for number of needles. Make the proper selection and press SET.
5. It will ask for what kind of floppy disk drive. In most cases, choose N1 and press SET.
6. It will ask for the type of head cards. It is usually 2 but not always; press SET when ready. Re-do this selection if you get false thread brakes continuously.
7. It will ask if you have the optional ATH sensor. In most cases NO, so spin the dial until it says MINUS –, and press SET.
8. Finished!
Error codes
- 211: Main shaft not at fixed position. Spin manually or use the ATH function.
- 225: Stitching outside of cap frame space.
- 281: Color change cannot reach needle position. Check for bind. Check potentiometer.
- 291: Thread break.
- 2B1: Tape reader error. No reader is detected.
- 2B2: Tape reader error. Data is corrupted.
- 2B3: Tape reader error. End code data is incorrect.
- 2B4: Tape reader error. Data is out of order. Please reset all units.
- 2B5: Sequin data has an error.
- 2B6: Tape reader error. No data coming in.
- 2B7: Please load data first.
- 2B8: Trying to run machine while data is still loading.
- 2B9: Memory writing error. Try erasing all memory.
- 2BA: Memory full. Erase designs.
- 2BB: Cannot frame back any more.
- 2BC: No data in memory here.
- 2C2: Incorrect option, please change.
- 2CE: Beam sensor is tripped, make sure both mirrors are aligned.
- 311: Main motor not spinning. Check the S-card if it is active. Check main shaft if it is bound.
- 312: Main shaft encoder giving incorrect signal. Check connections.
- 316: The S-card is giving an error signal. Check card.
- 322: The X-card is giving an error signal. Check card.
- 323: The Y-card is giving an error signal. Check card.
- 382: Color change motor is not moving. Check for binds. Check connections.
- 383: The color change location is not valid for running the head. Please check or re-center.
- 3D1: Battery error.
- 3D6: CPU card detects problem with main program. Reinstall.
- B01: Floppy disk format is not correct. Is the disk bad, or the floppy drive configured correctly?
- B02: Floppy file system is not correct. Is the disk bad, or the floppy drive configured correctly?
- B03: Floppy is marked as read-only.
- B04: Floppy drive says no disk is inserted. Check drive configuration.
- BC1: No tajima designs found.
- BC2: Cannot overwrite same name design.
- BC4: Floppy write failed. Re-try.
- BC5: Floppy disk is full.
- C01: No response to floppy drive activation signal. Check drive configuration.
- 1B1: Stop due to frame stepping.
- 1B2: Stop due to stop code.
- 1B3: Stop due to end of design.
- 1B4: Stop due to thread trim.
- 1B5: Stop due to sequin code.
- 1C1: Stop due to stop button.
If error code 311, 322, 323, 3D6, or blank screen on power up, please contact our repair department at PLR Electronics.Click here for other embroidery machine manuals
(C) 2009-2018 PLR Electronics