

USB Floppy Drive upgrade: 99 LED Version, IBM-LED
Upgrade your IBM floppy disk drive with 99 floppies on one USB
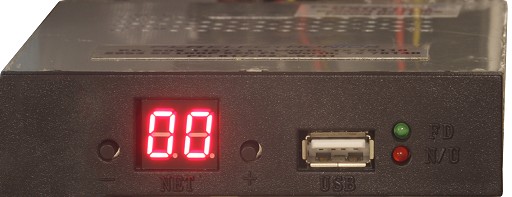
Our latest model of Floppy to USB converters, the 99 LED-IBM drive!
Instructions
Please prepare a USB stick by creating folders of the appropriate size.
Each folder cannot hold more than what your system can support. If it is 720kb, then do not place more than 720kb worth of files in each folder.
The dipswitches in this model, dipswitches 7 and 8, set what file size can be used; but cannot be more than your original industrial machine can support.
To simplify the folder creating, you can erase your USB stick fully by formatting in either FAT or FAT32.
Folder Creation
You can name your folder a unique name however it must be six characters or less, and include at the end a number between “01” and “99”.
This number will be identify the folder, during folder switching with the LED screen.
For instance, the folder names: “disk01”, “chris05”, “red07” are acceptable.
However, do not use the same number twice, or it will be a little confusing when selecting.
Keep in mind to not overload the folder with more data that can normally fit on one floppy.
Also, please keep the main directory of the USB stick empty. There should only be folders, in the main directory, to prevent possible problems.
Selecting Folders
When you power up the unit without a USB stick, the LED screen will say “00”. This will appear like an empty floppy drive.
When you insert a compatible USB stick, then the red light will flash, and folders will be scanned.
The first valid folder number will then be displayed on the LED. Only folders that exist on the stick will be on the list.
To select the next valid folder, hold either of the two buttons down for a split second, maybe 1/3 of a second, then let go. The number will increment to the next or previous found folder. The red light will flicker quickly.
HOWEVER, the data does not update to the new folder yet! You must next hold down either button.
The red light will be steady for a full second and then shut off. Now release the button. You should be at the next folder, and the drive will signal to the host system that the disk has been removed and changed.
Enjoy!
Troubleshooting
If you do not get a red light when inserting a USB stick, then there is no red light on insertion. Please re-format, or try a different brand/size USB stick.
If you get a red light on insertion, but the number of the LED never changed from 00, then make sure you have folders in the main directory named appropriately.
If you get the red lights, but never a green light when reading the drive, then make sure the dipswitches are correct for your model of machine.
If you are getting data errors when trying to read, make sure dipswitches 7 and 8, which govern floppy size, are configured correctly for your model of machine.
If you switch folders but the data does not update, then don’t forget, after you switch to a number, to then hold down the button again until the red light turns on for a long time; usually hold for a second.
For other troubleshooting tips, please see our other documents on troubleshooting USB drives.
— PLR Electronics
For more general purpose information on the USB floppy drive, please see the links below:
- More technical details on the USB Floppy click here
- More sales info and manuals on the USB Floppy click here
- For the floppy drive compatibility list click here
- For other manuals click here