
Tajima TME, TMEF User Manual
Instructions
(C) 2009-2018 PLR Electronics

Basics
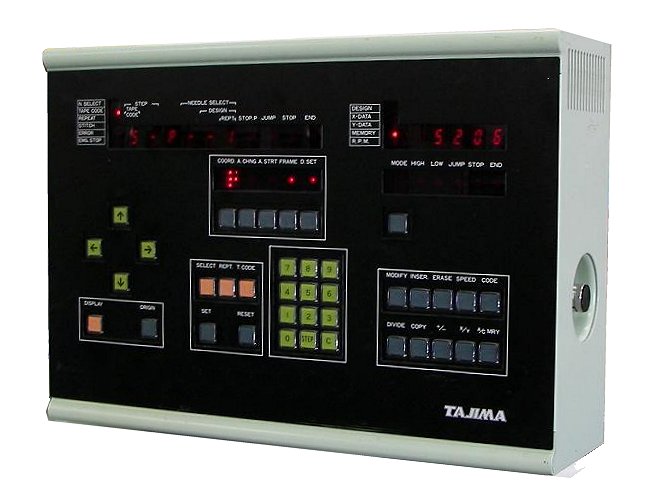
Main buttons (on the bottom left)
- DISPLAY: Change the information shown on the main screen. (N.SELECT, TAPE CODE, REPEAT, STITCH, ERROR)
- ORIGIN: Return to the start position. Press ORIGIN, then SET. Make sure home position is programmed.
- SELECT: To change the color change sequence.
- REPT: Repeat function.
- T.CODE: To load a new design.
- SET: To make a selection.
- RESET: To cancel errors.
Option buttons (top middle).
- COORD: To rotate the design. P and one blinking light is normal. Press STEP to change to 45 degree mode (two blinking lights). Press SET to make it stop blinking.
- A.CHNG: To switch between automatic and manual color change.
- A.STRT: To turn on automatic start after a color change.
- FRAME: To allow frame to be moved manually during sewing.
- D.SET: Press after you have chosen a new design, and have finished with options.
Edit buttons (bottom right)
- NUMERIC KEYPAD 0-9: Manual color change immediately. Also to insert values.
- STEP: To browse through menu options
- C: Clear button.
- MODE: To change a parameter.
- ERASE: Used in the memory erase function
- MRY: Memory Erase button; used in the erase-all function
Main menu list
- N.SELECT: To show the current automatic color sequence
- TAPE CODE: To show the loaded design
- REPEAT: To show the repeat settings
- STITCH: To show the stitch count. Press C to reset the count.
- REPEAT: To show the repeat settings
- ERROR: This menu is shown only when there is an error. Press RESET to clear.
- ALL LIGHTS: To show the current resize/scale setting.
Status lights
- STOP P.: Lights up when your main shaft is at the STOP position, marked in RED on the flywheel.
- JUMP, STOP, END: Lights up when you are at a JUMP code, STOP code, or END code.
Bar switch and button (under table)
- BAR SWITCH LEFT: Pull bar to the left to stop, or to go back one stitch
- BAR SWITCH RIGHT: Pull bar to the right to start; same as the green buttons.
- INCH BUTTON: Inching or Jog button. This is NOT an ATH button.
Frame move
- ARROW KEYS: Cause the frame to move manually.
Load a new design
1. Press TAPE CODE.
2. Press the 2 key and then press SET.
3. The blinking number is the first empty memory location for your new file.
4. Change this number, or leave it. Press the SET key when done.
5. Press the D.SET key. This will start the download from tape process.
6. Completion! Be sure to set a new offset for this memory location or it will use the old one.
You don’t have a Tape Reader? Purchase a new USB Reader for your Tajima TME-HC machine! Look at the front page of PLR Electronics!

Select a design in memory
1. Press TAPE CODE.
2. Press the 5 key and then press SET.
3. Choose a design by typing in the number.
4. Press SET when you have the number you want.
5. If you want to rotate the design, you do it now. Press COORD to rotate, and press SET when done. STEP will change between rotating 90 degrees (one blinking light) or 45 degrees (two blinking lights).
6. Press D.SET to continue with the process.
7. The screen will ask for a resize value. Accept the standard 100% value by pressing SET.
8. Make sure your offset is programmed or cleared, or the frame will move where you don’t expect.
9. To clear offsets, Press MODE, then 4, then SET.
10. Choose a start point with your manual arrow keys. Do NOT press SET again, or that will be the offset.
11. You are ready to start sewing!
Setting color change
1. Press the SELECT button.
2. The first color change will be chosen for editing, and the current color selection is blinking.
3. Press the number keys to choose a new color.
4. Press STEP to confirm, and move to the next color.
5. If the E is blinking, then no color has been chosen yet. Pick a color and press STEP.
6. When you wish to stop, choose a number and press SET instead of STEP.
7. Finished! Don’t forget the automatic color change and auto-start buttons, if you want it to be active.
Erasing design in memory
1. Press MODE, then press 1, then press SET.
2. Press ERASE, then press SET.
3. The top right screen will activate, asking which number to delete.
4. Type in the design to erase with the number pad.
5. Press SET to erase the chosen design.
6. Press MODE when done erasing designs.
Erasing all designs
1. Press MODE, then press 1, then press SET.
2. Press ERASE, then press MRY, then press SET.
3. Wait a few seconds. All designs should now be erased.
Error codes
Press the RESET button to cancel most errors.
- ERROR E-02, E-03, E-04: Tape data error.
- ERROR E-06: Memory error. Please clear all memory.
- ERROR E-08, E-09: Reader error; try again.
- ERROR E-11: Data set not done correctly. Choose design from beginning.
- ERROR E-12: Cannot stitch backwards that far.
- ERROR E-13: Offset problem. Clear offset.
- ERROR E-16: Memory is empty. Load a design first.
- ERROR E-17: Memory is full. Clear designs.
- ERROR E-18: This design is erased. Choose another.
- ERROR E-19: Memory is full. Clear designs.
- ERROR E-30, E-31: Stop bar chosen at wrong time.
- ERROR E-51: Stop position error. Please set main shaft until STOP P. is lit.
- ERROR E-52: Limit switch. X or Y at the limit; adjust sensors if too small.
- ERROR E-53: XY Driver problem.
- ERROR E-54: Limit switch problem.
- ERROR E-55: Color change motor not moving. Inspect.
- ERROR E-56: Half-turn cam troble. Check color change.
- ERROR E-57: Color change needle position error. Check color change.
- ERROR E-58: Main motor not spinning. Check to see if polarity needs to be reversed on the three phase 220V brake box.
(C) 2009-2010 PLR Electronics