
Barudan BEMS User Manual
Instructions
(C) 2009-2018 PLR Electronics

Basics
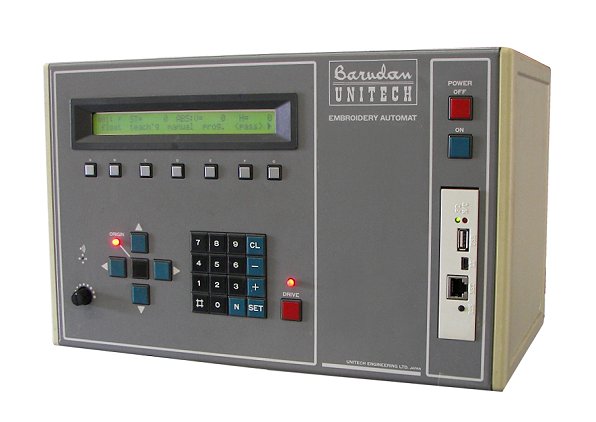
Control Panel Buttons
- POWER ON-OFF: Turn on machine; only works if underneath relay is on
- NUMBER PAD: Enter number selections
- LCD BUTTONS: To choose from among the LCD menu; each button is underneath the menu option.
- # KEY: To change the current design pattern. Press # then number then SET. Not active in drive mode.
- N KEY: To change the current needle automatically. Press N then number then SET.
- CL KEY: To clear value on the screen
- SET KEY: To make a selection
- +/- KEYS: To advance through lists
Main menu list
- READ: To load new designs
- EDIT: To modify designs in memory
- MANUAL: Thread trimming
- PROG: Scaling, Rotation, Offset
- PASS: Information on size of design, free memory remaining
- DRIVE: Enters DRIVE mode
- PUNCH: Exports design data
- DELETE: Delete designs from memory
- COPY: Copy designs to other locations
- MC: Machine Parameters
- FLOPPY: Floppy Utilities
- NEXT ARROW: Show next menu
- *FLOAT: Only in drive mode. To advance through the pattern without sewing. Press FLOAT and bar switch, or FLOAT, number, bar switch.
- *TEACH’G: Only in drive mode. Set the color change sequence.
- *MIRROR: To quickly mirror the design
Bar switch and button (under table)
- BAR SWITCH LEFT: Pull bar to the left to start sewing
- BAR SWITCH RIGHT: Pull bar to the right to stop sewing
Unpowered needle change
- COLOR CHANGE BAR: Pull the near color change bar to the left. Rotate turret with far color change bar, making sure the catch pins fall within the V shaped groove.
Frame move
- ARROW KEYS: Cause the frame to move manually.
Load a new design
Loading from the Floppy Disk or USB drive.
1. Choose the READ menu option.
2. Press the DEVICE key until FD appears.
3. Wait until green light stops blinking.
4. It will say “#01: (ADD) <== TFD:001[G001]”, or similar. The first number is location, the second is ADD/NEW, the third is the list of G000.DST files found.
4. Press the + and – keys to select a design. Only designs named G001.DST, G002.DST, etc, will be included in the list.
5. Select an empty memory location by pressing the # and SET keys, if you have not already done so.
6. If you are overwriting an existing design, press NEW/ADD until it says NEW
7. Press START when ready. If you are overwriting, you will get a confirmation screen; choose YES
8. If it says “May I add this design” then you have probably chosen the ADD function instead of NEW. In this case choose NO and start over.
You don’t have a USB replacement yet? Purchase a new USB Floppy Disk Drive for your Barudan BEMS machine! Look at the front page of PLR Electronics for more!

1. Choose the READ menu option.
2. Press the DEVICE key until TAPE appears.
3. Make sure it says U-TAPE by pressing the CODE if you have to.
4. Select an empty memory location by pressing the # and SET keys, if you have not already done so.
5. If you are overwriting an existing design, press NEW/ADD until it says NEW
6. Press START when ready. If you are overwriting, you will get a confirmation screen; choose YES
You don’t have a Tape Reader? Purchase a new USB Reader for your Barudan BEMS machine! Look at the front page of PLR Electronics!
Select a design in memory
1. Make sure you are not in DRIVE mode. If you are, then choose ABORT from the menu.
2. Press the # key.
3. Type in the desired design number.
4. Press the SET key.
Setting color change
1. Select a design first by pressing #, number, and SET, if you have not already done so.
2. Now enter DRIVE mode, first, by pressing DRIVE. You do not have to set the ORIGIN when it asks, say NO.
3. Choose the TEACH’G function. Notice it will flash on and off.
4. Press SET.
5. You will be at the first color change. Choose a number, and press SET when ready.
6. Repeat while there are more colors.
7. It will say COLOR MARK NOT FOUND at the end.
Erasing design in memory
1. Select the design to be deleted by pressing #, number, and SET.
2. Choose the DELETE function from the main menu. Be sure to press the G key if you do not see it on the menu screen.
3. A confirmation screen will appear. Select YES to delete the design.
Immediate Thread Trim
1. Select the MANUAL menu function from the main menu.
2. Choose the T.TRIM option from the menu. It will start flashing.
3. The screen will say “START WITH BAR SWITCH”.
4. Pull the start bar and the trimmers will operate.
5. Choose the T.TRIM option again to make it stop flashing.
Immediate Needle Change
1. Make sure you are at the main menu screen.
2. If you are not at head up, then do a thread trim operation first
3. Press the N KEY.
4. Type in the number of the needle.
5. Press SET.
6. The needles will now change.
Error codes
If unable to control pantogram, or the control panel is stuck at origin seek, then check cables and reseat the CPU cards underneath, with power off. Contact our repair department if you suspect damage.
(C) 2009-2018 PLR Electronics