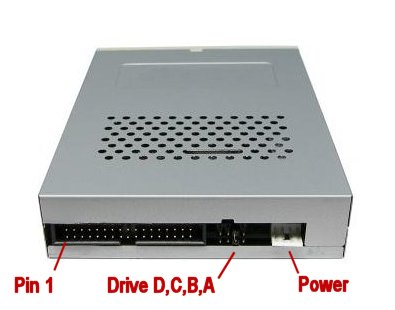
Sodick Floppy Drive upgradeReplace your NEC floppy disk drive with USB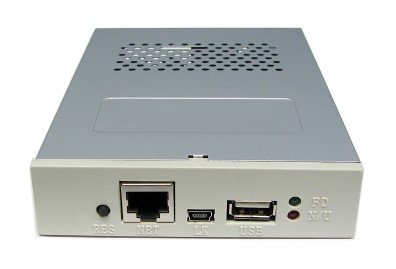 This page will help you replace the floppy disk drives in your Sodick EDM computer with a USB drive. Inspection of the original Sodick floppy drivesPlease open up your computer and inspect your original floppy disk drive. Note if it is an NEC FD1135 or NEC FD1137, or some other model such as the TEAC FD235HG. Depending on your drive model, you may have to change the USB drive dipswitches which are located in the USB floppy device. If we know your drive type beforehand, the dipswitches may already be set. Note the location of the power plugs and the red stripe on the ribbon cables. When you install your USB device, the red stripe will have to go in the same orientation; the power plug may or may not be inverted, but it will only plug in one way so do not worry about that one. Please remember the red stripe on the larger data cable. Note also that there will be some jumper switches on your original floppy disk drive. There will be jumper switches to set the drive between DRIVE 0, DRIVE 1, DRIVE 2, and DRIVE 3. Note where the jumper is on the “system” drive and the “user” drive. You will want to set your USB Floppy drives to the appropriate number; look at the picture and use DRIVE A for DRIVE 0, and use DRIVE B for DRIVE 1, etc. This will determine which USB drive will be the USER and SYSTEM drives.  Do not unplug your drives yet! You will need to prepare a SYSTEM boot disk on a usb stick first so your Sodick computer may boot properly, and to do this we may have to install only one drive and run the computer with one original, and one USB. Installing the Sodick USER drivePlease identify your USER drive first. We will replace the USER drive first, so we may create a proper boot disk on a USB stick for later use in the SYSTEM drive. When you remove your USER drive, note the jumper settings; is this floppy drive set to DRIVE 0, or DRIVE 1? The jumper will be either next to a 0 or 1 symbol on the circuit board of the original floppy drive. This applies to the NEC type of drive, the others may be harder to identify; let us know if you are having trouble or send us a picture. Now, set your USB drive to the same setting, on the jumper system on the very back of the USB replacement drive as shown in above picture. DRIVE A corresponds to DRIVE 0. When the replacement USER drive is plugged in and relatively secure, then power up the Sodick computer and observe the lights on the USB drive. It should flicker red on powerup, and then flicker red again when you insert a USB stick. It may flash green if the system scans the drives at power up. For more detailed info on the lights, please look at our USB technical document in our Services section of the website. Preparing the USB stick for actionYou will be preparing two USB sticks for your Sodick EDM. One stick will be prepared as a SYSTEM boot disk, and will become not easily acceable with standard windows computers (but backup-able). The other stick will remain usable as a general purpose USER disk accessable through any USB port on your Windows computer. If you haven’t used our product before, then be advised that you will not be able to store anything more than 720kb on your USB stick, or else some files will not be included in the file list. More details are in our USB documents section, but suffice to say that we cannot pretend to have greater abilities than what an ordinary NEC FD1137 drive can do. There is an exception with the optional File Chooser as noted in our docs. You must have a compatible USB stick that is prepared correctly. Please limit the USB stick size to 2GB or lower (if possible the first time, to reduce incompatiblity issues), and format the USB stick as FAT or FAT16 only; do not format the stick as FAT32. EDIT: At least try not to use large FAT32 sticks on the very first installation; go ahead and attempt to upgrade the sticks only AFTER the whole thing is working is our advice. If your stick is compatible and prepared, then it will cause the USB device to flicker red when you insert the USB stick. If there are no lights, then it is either a dirty or poor contact, or the USB drive is unable to initialize your stick. If you are sure that the format is correct, you may have to try another brand or size of USB stick. A second check if your stick is compatible is to observe while the GREEN light is on; it will only do this when your Sodick computer is trying to read the drive. If you also get a RED light, then your stick is fully compatible; if you get green but no red, then it is not.
Preparing the Sodick SYSTEM boot diskThis section may be specific to your Sodick software version. Install the USB emulator as the USER drive. Turn on your Sodick computer and boot from your original SYSTEM floppy drive. If you have skipped instructions, then you may have installed both USB drives at the same time; don’t do this, and restart from the beginning. The USER drive should be accessed during boot. Note the lights, as per above; if you get a green light but no red light, then you have a USB stick problem. If you never get a green light and your Sodick computer is unhappy that it cannot find a USER drive, then you may have configured the jumpers incorrectly. If it cannot even boot from the system drive then you definitely need to recheck jumpers on all drives; make sure that both floppy drive and USB drive are not set to the same DRIVE number, for instance. User drives are usually drive B. If it boots properly and starts the Sodick programs, then congrats, it has read some files from your new USER drive successfully! But now it’s time to prepare a new boot disk. Make sure to follow the software specific instructions on how to prepare a new system disk using the USER drive. You will certainly have to remove your working USER USB stick so you can insert the SYSTEM USB stick instead. Please note all lights behavior as well for your second USB stick, to see if there is a problem; a conservative behavior may be to prepare both of the USB sticks as user disks, just to make sure that both can be accessed correctly. EDIT: Customers have a higher chance of success when they email us and we provide a sample sodick boot disk file, and they place this onto the USB stick that is to be the SYSTEM stick. There should be no other files on the SYSTEM stick in this process. When your Sodick computer prepares the USB stick as a system disk, remember that this particular USB stick will no longer be readable in Windows. EDIT: It will be one large file representing the entire disk, that is copyable and backupable. When the format is over, and the RED light goes off, then you may remove the USB stick. NEVER remove the USB stick while the red light is on! Installing the Sodick SYSTEM driveNow install the other USB drive in place of the SYSTEM drive. Make sure the jumpers match with your replacement drive jumpers, as you did with the first drive. Meaning SYSTEM drive needs to be set to drive A, and USER drive needs to be set to drive B (jumpers on the back side near the ribbon cable, see pictures elsewhere on page). It’s time for the big test; insert your SYSTEM usb stick and the USER usb stick in the appropriate drives. (You did mark them?) Power on; does it fully work? We hope it does, and let us know if there are any problems! EDIT: Some customers report better boot success by asking the drive to default to the special boot disk format; this may be important because the drive does a format switchover once it loads from the USB stick but some sticks take time to boot and the Sodick computer doesn’t allow any time! Typically, Dipswitch 6 ON, 7 OFF, 8 ON, is for the typical 8×1024 format of sodick system disks. DON’T do this to the USER drive, only to the SYSTEM drive, after you have created a system disk. Also please try to boot more than once. NOTE: The sample Sodick boot file we provide to customers (given to us from other customers), sometimes they will boot up your Sodick computer but customers report that the parameters are all wrong for their machine; so you can do this as a test, just to see if it theoretically works, but don’t use this as part of the create-boot-disk process! Any file we provide is meant to be overwritten using your Sodick boot disk creation menu! (We don’t understand which Sodick disks were shared with us, they might as well be random) 1) Install user USB drive. Boot problemsWe’ve noticed that if your system boot disk image is 720kb (rare), then it can with a high percentage load from the USB stick in time for the sodick computer to start accessing it; however larger image files (most customers we think) may not load in time (red light is on too long at power up, boot up errors, lock up, etc). To get around the long transfer time of the USB stick’s image file to the USB drive memory (USB sticks cannot initialize instantaneously although some are faster than others), please reset your sodick computer using the reset button (SOFT reset); this will allow time for the USB device to complete the transfer from the USB stick. EDIT: Also attempt DIPSWITCHES 6 ON, 7 OFF, 8 ON, when you get to this stage, to force the USB drive into the proper format as a default, while its trying to hurriedly boot the USB stick and then load the sodick software into its m |
Sodick Floppy Drive