
Barudan BESR User Manual
Instructions
(C) 2009-2018 PLR Electronics

Basics
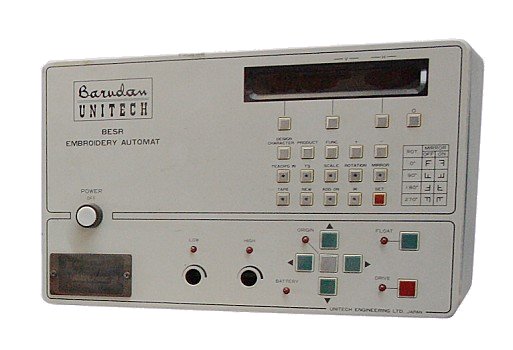
Control Panel Keys
- PRODUCT: Shows stitch counter. Is reset by pressing + and – simultaneously.
- FUNC: Edits function codes of a design in memory.
- + AND – KEYS: To increment or decrement parameters.
- TEACH’G: To program the color change sequence.
- TS: Activates thread trimming at color change or stop codes. Toggles on and off.
- SCALE: Resizing of the design. Use the + and – keys.
- ROTATION: Rotation of the design. Use the + and – keys.
- MIRROR: Quick mirror of the design. Toggles on or off.
- TAPE: To bypass memory and sew one stitch at a time from tape.
- NEW: To store a design in memory.
- ADD: To add to a design in memory.
- * KEY: To delete a design.
- SET: To accept a parameter.
- MENU KEY 1 (LEFT): To change the current design number.
- MENU KEY 2 (MIDDLE): To change the tape code.
- MENU KEY 3 (RIGHT): To rotate design by 45 degrees.
- O KEY: To change between absolute or incremental frame movement information.
- ORIGIN: Hold down shortly to cause frame to seek origin point of design.
- FLOAT: When toggled on the design will move through the design without sewing.
- DRIVE: Activates and de-activates DRIVE mode. Press to activate, hold down to de-activate.
Parameter setting
- PARAMETERS: Hold down the O KEY for one second to enter parameter settings. Use the +/- keys and the O KEY to configure machine.
Bar switch and button (under table)
- BAR SWITCH LEFT: Pull bar to the left to stop sewing.
- BAR SWITCH RIGHT: Pull bar to the right to start sewing.
Frame move
- ARROW KEYS: To manually move the pantograph.
Load a new design
Loading from the Tape Reader or USB Reader.
1. Be sure you are not in DRIVE mode. If the DRIVE light is on, then hold down DRIVE until stops beeping.
2. Press the NEW key.
3. Press MENU KEY 2 on the upper middle until the menu says U.
4. Press MENU KEY 1 on the left until you have chosen the memory location to store in.
5. Press the DRIVE key. The download will start.
6. Finished!
You don’t have a Tape Reader? Purchase a new USB Reader for your Barudan BESR machine! Look at the front page of PLR Electronics!

Select a design in memory
1. Be sure you are not in DRIVE mode. If the DRIVE light is on, then hold down DRIVE until stops beeping.
2. Press MENU KEY 1 on the upper left until you have picked a new design.
3. Move the pantograph to your design start location.
4. Press the DRIVE key.
5. Pull the bar switch to the right. You should hear a beep.
6. Done!
Setting color change
1. Be sure you are not in DRIVE mode. If the DRIVE light is on, then hold down DRIVE until stops beeping.
2. Switch to the design you wish to program color change for by pressing MENU KEY 1.
3. Make sure the TEACH button is OFF. If the light is on, press button to turn it off.
4. Hold down TEACH button until it starts flashing and beeping continuously.
5. Press DRIVE button.
6. The display will scroll to the next color. Use the + and – keys to change to the desired needle number.
7. Press DRIVE to set the color, and repeat until the end of the design.
8. There is not usually a color change at the beginning, so set the color manually before sewing.
Erasing design in memory
1. Be sure you are not in DRIVE mode. If the DRIVE light is on, then hold down DRIVE until stops beeping.
2. Press the * KEY.
3. You will see on option for Thread Trim, and for DELETE.
4. Choose the DELETE option by pressing MENU KEY 3 on the upper right.
5. You will now be at a delete menu.
6. Press the + and – keys to select the design to erase.
7. Press the SET key to delete the design.
Immediate thread trimming
1. Be sure you are not in DRIVE mode. If the DRIVE light is on, then hold down DRIVE until stops beeping.
2. Press the * KEY.
3. You will see on option for Thread Trim, and for DELETE.
4. Choose the THREAD TRIM option by pressing MENU KEY 2 on the upper middle.
5. The display will show BAR START !!
6. Pull the underneath bar to the right to activate immediate thread trim.
Error codes
- E2 MANUAL SW: For roll to roll operation
- E3 UNLOCK: When color change turret is off position. Check if the pin is in the V-shaped groove on the heads.
- E4 READER: The tape reader is not seen.
- E5 TAPE ERROR: When tape reader data is incorrect.
- E6 NO DESIGN: When a memory location with no design loaded is chosen.
- E7 MEMORY ERROR: This memory location has been deleted.
- E8 FULL DELETE: The memory is full, delete some designs.
- E9 DESIGN REFUSED: Reload the design, or delete a design from memory.
- E10 SLIDER INACTIVE: One of the hook grabbers underneath the head is stuck, or not at its sensor home position.
If unable to control pantogram, then check your J2, J3, J4 boards with power off. Also check the chunky bar transistor, which is to the right of the J4 slot. Contact our repair department if you suspect damage.
(C) 2009-2018 PLR Electronics