USB Floppy
FAQ and Installation Guide
Chapter List
1. Who is it for?
2. What can I do with it?
3. What do I do before buying?
4. I have it, what now?
5. How do I get it working?
6. How do I format the USB stick?
7. What do I do with the file chooser?
8. What do I do with the image type?
9. How do I buy?
Who is the USB Floppy disk drive for?
If you use floppy disks everyday in your machine, the USB Floppy is for you!
What can I do with the USB Floppy?
| 1. If your machine uses MS-DOS compatible files, you can install a USB floppy and transfer files back and forth from your computer with a USB flash jump drive. The USB Floppy will only see files up to the 1.44mb limit that your machine is capable of. | |
| 2. If you also want one USB jump drive to store many floppy disks, you would also order a File Chooser attachment. Then you can have many folders on the USB flash stick, and each one can represent a different floppy disk. | |
| 3. If your machine is not compatible with MS-DOS files, and uses custom formatted disks, then you can install a USB Floppy Image type, which will keep one big file on your USB stick representing your floppy disk. You may copy this file to your computer as a backup. | |
| 4. If your machine is not compatible with MS-DOS files, and has a separate design computer, then you can install two USB Floppy Image devices, one in the design computer and one in the production machine, and you simply move the USB stick back and forth or occasionally make a backup copy in your ordinary IBM computer. | |
| 5. You may also use a file chooser with the USB Floppy Image device as well, but it is a different model than the normal file chooser. Then you may have many disk-images on your USB stick at once. | |
| 6. If you have a dozen or more machines, you can try the USB Floppy Network device, where you would install a USB Floppy in every machine in your large shop and all of their file contents will be controlled by a central windows computer. The normal USB stick operation works when you are not using the network. Compatibility with machines is limited. |
What do I need to do before purchasing a USB Floppy?
Please answer the following questions before you order. Email the answers to sales@plrelectronics.com . If you cannot answer them all, then we may be able to help anyways, or find out.
| 1. First, do you know if your machine uses DOS-compatible files? Can you take a floppy disk formatted in your machine, and put it in your home or office Windows computer and read the contents with Windows Explorer? | |
| 2. Second, what is the make and model of your machine? Perhaps we already know which USB Floppy drive you need. | |
| 3. Third, what is the model of your floppy disk drive? What is the height, normal height or a slim laptop height? | |
| 4. Fourth, what does the back of your floppy drive look like? How many pins are on the back of your original floppy drive? Is it a typical grey cable with 34 pins or 26 pins? Is it a flat white cable that is miniature and hard to see? Does it have a separate 4-pin power connector? Please also note where PIN #1 is on the floppy drive; a red stripe on the ribbon may be a hint, or missing pins on the 34-pin array may be another hint (usually pin #2 or #3 is removed, so PIN 1 is next to it.) Mark PIN #1 for the future. | |
| 5. Any other information is helpful if you cannot answer the above; have you replaced the drive before, and from where? Are there schematics or pinout information? | |
| 6. If you haven’t done so already, plan to purchase a USB flash thumb drive. Make sure you have at least two different USB sticks, because compatibility is not 100%. It is helpful if the USB sticks are 2GB or under, but not a requirement if you have Windows 7 or our special format program. You may also order known working thumb drives from us. | |
| 7. Now order from our web shopping cart, or from ebay, or call our sales number. If you order we will contact you if you do not email us enough information; you may email before or after ordering. |
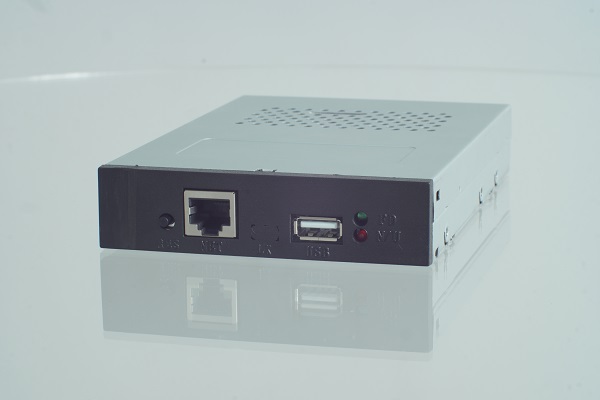
I have the USB Floppy, now what?!
| 1. Please remove the USB Floppy from packaging and inspect for damage. Notice on the front that there are a few ports, plus two lights, red and green, on the right. On the top of the unit are a bunch of holes and a long rectangular slot. If you look inside, there are dipswitches viewable, which you may access with a toothpick or other slim tool. On the back of the unit are connections for data and power. Note that PIN 1 of the 34-pin data connector is on the INSIDE edge of the connector, or the side of the connector near the little 4-pin plug. (If you have a USB Floppy 7-Japanese type of drive then the PIN1 is on the outside edge.) | |
| 2. There should be mounting holes along the bottom and the sides or your USB Floppy device. Some of these holes should match the mounting bracket of your machine, where your floppy disk drive is sitting right now. Don’t take it out yet! | |
| 3. Look at the USB Floppy, at the hole with the dipswitches. One side of the dipswitches will say ON, and that implies the other way is OFF. They will be numbered 1 through 8. If your machine only uses double-density disks, then use a toothpick and set pins 7 and 8 to the OFF position. It may be a good idea to try this first no matter what, and then change it later once you have it working on double density mode. | |
| 4. Look at dipswitch 5. Leave it alone for now. Most machines will want dipswitch 5 to be in the off position, but not all of them. If you know for sure that your floppy drive uses DS0, then set dipswitch 5 ON; but for most customers (DS1 or a DRIVE A/B type of computer) they will want it to be OFF. We may have set it for you, so again leave it. | |
| 5. Leave all other dipswitches, we may have set it for you. But you may have to change them after powering up your machine, if it does not work the first time. | |
| 6. Now inspect your original floppy drive, with your machine OFF. How is the 34-pin ribbon cable connected, is the red (or blue) stripe on the inside or the outside? When you remove the cable, is there a missing pin? If so, then that is the pin 1 identifier and so mark that side of the grey floppy cable. Perhaps the missing pin side is not the same side as the colored stripe, which is why we go through this process. If there is no missing pin, then try to inspect the circuit board on the original floppy drive to see if one side of the plug is marked “1” or “2”, and the if the other side is marked “33” or “34”, also a good indication of which side is pin 1. | |
| 7. When you are sure which side is pin 1 of the grey data cable and marked it on the cable, then you may go through the process of removing your original floppy drive with a screwdriver. | |
| 8. You should connect the grey ribbon cable to the USB Floppy as a test, first. Make sure that PIN 1, whether its the stripe or not, is to the inside edge of the socket, not the outside edge. There may be a bump on your original ribbon cable, but the USB floppy can usually handle it whether its on top or the bottom. | |
| 9. Attach the USB Floppy to your system, but lightly. Use only one screw if possible; you may have to unscrew everything all over again if you need to change dipswitches for compatibility. | |
| 10. Make sure to attach the 4-pin power plug correctly. Inspect, it may accidentally be inserted too high in the hole, and so it is actually riding over the pins instead of snug into the pins. | |
| 11. Be sure again that the grey ribbon cable’s pin 1 side is to the inside edge of the USB Floppy ribbon socket. | |
| 12. Now make sure you did not leave any loose screws or articles on the inside of your machine, and power it up. Look at the USB Floppy drive when you do so. Make sure there is no USB stick inserted. If you see a short flicker of a red light on the front screen, then the first part of installation was a success! But you cannot close everything yet, you must now ensure functionality. ERROR: If when you power up, you get the RED or GREEN light on all the time, then turn your machine back off! That is a clear sign that the grey data cable, despite our efforts, is unside down anyways; flip it and try again. If the lights are still either or both on, then the unit must be replaced, and let us know. | |
| 13. Move on to part two, and do not screw anything in permanently, we still don’t know if the dipswitches are correct. |
It’s in the machine, how do I get it to work?
| 1. If the USB Floppy is connected to your machine and you’ve powered up and you saw a flicker of the red light and no other lights, then step one of the installation was successful. You are looking at the lights on the front panel, not on the interior of the unit. Leave your machine on. | |
| 2. Insert a formatted USB stick into the drive. Please look at the formatting USB section of this help guide for more info. You should see a flickering red light at the bottom right of the front panel of the USB Floppy. If you do not see a red light, remove and insert stick again. Check again if you’ve formatted correctly. If nothing works, then try a different USB stick, and then with a fresh format. If neither USB stick gets a red flicker light response from the USB Floppy, then you may have to try a third one, preferably from a different brand or smaller size. If you instead get a red light on all the time after you put the USB stick, then that is the same as if it did not flicker at all. | |
| 3. Once you get the flickering red light, then if you have a DOS-compatible-file machine you may now place a sample file on the stick, if you have not done so before. Any file that your machine works with. If your machine is asking for a boot disk, then please look at the Boot Disk section of this help guide. If you have the non-DOS compatible file system, then look at the Image Disk part of this help guide before continuing. | |
| 4. With the USB in the drive and no lights flickering, then try to read from the USB stick. This is the first major test if your dipswitch configuration is correct. | |
| 5. Look for a solid or slow flashing green light the instant you start the read-disk function on your machine. If you do not get any green light at all, and the machine says there is a floppy drive error or no disk in drive, then you must turn off the machine and remove the USB Floppy and change dipswitch 5 the other direction than what it was. If you try it both ways and there is still no green light, then either the data cable is upside down or you have the incorrect model or your USB Floppy is malfunctioning. | |
| 6. If you get a solid or pulsing green light but no red light at the same time, then either your USB stick is not compatible or is not plugged in; try replugging the USB stick after the lights stop. | |
| 7. If you get a green light and a red light at this point, but a floppy error occurs, then we are ready for the next step of installation; turn off the machine and remove the USB Floppy, and inspect the dipswitches. See if your drive is already on our compatibility list by CLICK ING HERE, your configuration may already be known. | |
| 8. If instead you get a successful list of files, then perhaps you are done! But reading a file list and actually loading a file on that list are two different things, so please attempt to load the file. If successful, then one more step, can you take the USB stick out and place a different one in and it sees that you have changed sticks; if so, you likely have no more need of this help guide! But, if you get a file read error then continue with the next step of installation. | |
| 9. You should have set dipswitches 7 and 8 to OFF already, or at least inspected. If they are not OFF, then flip them OFF and try again. | |
| 10. We will now focus on dipswitches 1 through 3. Leave the rest where they are. There is a chart explaining technically what dipswitches 1-3 do here, but you can do this without reading the chart. | |
| 11. Flip dipswitches 1, 2, and 3 all OFF. Remount so the USB Floppy is safely attached, and turn on the machine and go through the process again. If you are having some success, make sure you can both read the directory list AND actually load a file. | |
| 12. Perhaps there is a different error this time. There are a total of eight combination that dipswitches 1-3 can do. Try them all: 000, 001, 010, 011, 100, 101, 110, 111. | |
| 13. If you have tried every combination and you still get errors, then flip dipswitch number 4 to the other side from where it has been. Try all the 1-3 combinations again, and be sure to power down each time. Sometimes you may shortcut and press the black button on the front of the USB unit, but this is not as guaranteed as the slower way. If this does not work, contact us and let us know what kind of machine you have and what model of USB floppy was sent to you. Also let us know which dipswitch combination have more success than others. | |
| 14. You may also try the entire dipswitch process with dipswitches 7 and 8 ON, which is 1.44mb mode, but only if you know for sure your machine supports high density disks AND does not expect boot disks sized 720kb. Make sure that you’ve paid attention to the lights, and have not advanced or skipped any steps without getting confirmation that the lights are acting as expected. | |
| 15. If you have a non-DOS-compatible system after all, then make sure you have completed the section on USB Image files first, and that the first thing you must be doing is formatting, not reading; but again that should be covered in the Image section. |
How to format your USB stick
| 1. If you have Windows XP, make sure your USB stick is 2GB or less. You do not have this limitation if you have Windows 7 or using our special format program. | |
| 2. In Windows, open up your Windows Explorer program, or whatever used to view the list of disk drives in your system. | |
| 3. Insert your USB stick in your home or office Windows computer. It may take a few seconds to initialize the USB stick. | |
| 4. When the USB stick is ready, a new disk drive will appear on your list of disk drives. It may be called USB, or Removable Drive, or the brand name. It may be drive D:, or drive H:, or some other drive letter. Right-click on the new USB stick entry and select FORMAT. | |
| 5. You will be given a few format options. You are interested in the FILE SYSTEM option. Change it to say “FAT” or “FAT16”. Do NOT choose “FAT32”. If you do not have these options, then try to use our other format program, or Windows 7. | |
| 6. If there is a volume label, please erase it, but this is only important for boot disks. You may click the Quick Format option ON, if you have it, to save time. | |
| 7. Click START, and the format will finish shortly. Done! Load your USB stick with your data files. | |
| 8. If you have an IMAGE type of USB Floppy, then you will have to either put the USB stick in your host machine and do a format from there, or create/copy a blank image file using a program such as WinImage; look in the USB image section. |
It works with USB sticks now, so how do I use the file chooser?
I have a custom non-DOS system so I purchased the Image type of USB Floppy. Now what?
Where do I buy the USB Floppy?